Read Temperature by Measuring Millivolts
Thermocouple Reference Tables
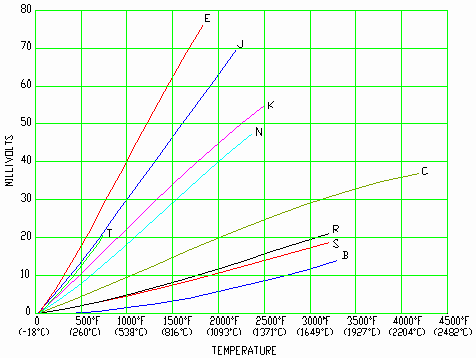
The N.I.S.T. (National Institute of Standards and Technology) is the U.S. standards setting agency. They have determined the output millivoltage of all type thermocouples, at all temperatures, within their range. The resulting tabulations are called “Thermocouple Reference Tables” and the thermocouple output millivoltage is shown for each degree of temperature.
| Thermocouple Reference Tables | |
|---|---|
| Type B Thermocouple | an-htp08.pdf |
| Type R Thermocouple | an-htp09.pdf |
| Type S Thermocouple | an-htp10.pdf |
| Type T Thermocouple | an-htp11.pdf |
| Type K Thermocouple | an-htp12.pdf |
| Type C Thermocouple | an-htp13.pdf |
The junction of each type thermocouple produces a specific millivoltage across it at a specific temperature. A thermocouple consists of two junctions connected in opposition. One is the measuring junction and the other is the reference junction. VD is the millivoltage resulting from the difference between the millivoltages generated by the two opposing junctions. VD is the millivoltage read when a meter is connected across the thermocouple as shown below.
How to Determine the Measuring Junction Temperature
- Measure the “VD” millivoltage as shown above.
- Measure the actual temperature of the reference junction with a thermometer.
- Go to the table for the thermocouple being used and look up the millivoltage produced at that temperature.
- Add that millivoltage to the millivoltage measured as “VD” to get a total.
- Find that millivoltage total in the reference table. The corresponding temperature is the temperature of the measuring junction.
Example #1 – Type “T” Thermocouple
Measured “VD” = 3.41 mV
Reference Junction Temperature = 22°C (71.6°F)
- From the table; 22°C = 0.87 mV.
- Adding 0.87 mV to 3.41 mV = 4.28 mV.
- Finding 4.28 mV In the table; the corresponding temperature is 100°C (212°F) and is the temperature of the measuring function.
Example #2 – Type “T” Thermocouple
Measured “VD” = 4.47 mV
Reference Junction Temperature = -5°C (23°F) (lower than the table reference of 0°C)
- From the table; 5°C = -0.193 mV
- Adding -0.193 mV to +4.47 mV = +4.28 mV
- Finding 4.28 mV In the table; the corresponding temperature is 100°C (212°F) and is the temperature of the measuring junction
Metric/English Scale Conversion °C = °F – 32 °F = 1.8°C + 32
| ANSI LETTER | LEG* | METALLIC COMPOSITION | MELTING POINT | USABLE TEMPERATURE RANGE | TOLERANCES (THE GREATER OF BASE OR % OF READING) | REFERENCE TABLE DATASHEET NUMBER | ||
|---|---|---|---|---|---|---|---|---|
| °F | °C | (LONG TERM) | **STANDARD | PREMIUM | ||||
| B | P | PLATINUM +30% RHODIUM | 3320 | 1825 | 400 TO 3050 ° F | ± 0.5% | NOT SET | AN-HTP08 |
| N | PLATINUM +6% RHODIUM | 200 TO 1680 °C | ||||||
| C *** | P | (TUNGSTEN +5% RHENIUM) | 4500 | 2480 | 30 TO 4200 ° F | NOT ESTABLISHED SEE IPTS-90 | N.A. | AN-HTP13 |
| N | (TUNGSTEN +26% RHENIUM) | 0 TO 2300 ° C | ||||||
| E | P | CHROMEL®, | 2230 | 1220 | -300 TO 850° F | ± 1.7° C | ± 1.0 ° C or | N.A. |
| N | CONSTANTAN | -200 TO +450° C | o r± 0.5% | ± 0.4% | ||||
| J | P | IRON | 2230 | 1220 | 30 TO 700° F | ± 2.2° C | ± 1.1 ° C or 0.4% | N.A. |
| N | CONSTANTAN | 0 TO 400° C | or ± 0.75% | |||||
| K | P | CHROMEL, | 2550 | 1400 | -300 TO 1800° F | ± 2.2° C | ± 1.1° C or ± 0.4% | AN-HTP12 |
| N | ALUMEL, | -200 TO 1000° C | or ± 0.75% | |||||
| N | P | NICROSIL**** | 2440 | 1340 | 30 TO 1800° F | ± 2.2° C | ± 1.1° C | N.A. |
| N | NISIL | 0 TO 1000° C | or 0.75% | or ± 0.4% | ||||
| R | P | PLATINUM +13% RHODIUM | 3215 | 1770 | 400 TO 2700° F | ± 1.5° C | ± 0.6° C | AN-HTP09 |
| N | PURE PLATINUM | 200 TO 1500° C | or ± 0.25% | or ± 0.1% | ||||
| S | P | PLATINUM +10% RHODIUM | 3215 | 1770 | 400 TO 2700° F | ± 1.5° C | ± 0.6° C or ± 0.1% | AN-HTP10 |
| N | PURE PLATINUM | 200 TO 1500° C | or 0.25% | |||||
| T | P | COPPER | 1980 | 1080 | -450 TO 660° F | ± 1.0° | ± 0.5° C or ± 0.4% | AN-HTP11 |
| N | CONSTANTAN, | -270 TO 350° C | or 0.75% | |||||
|
* P=Positive Leg N = Negative Leg **”Standard” grade wire is sufficiently accurate for most applications. The purity and composition of “premium” grade wire is more closely controlled, and its millivoltage output is closer to the NIST standard chart and therefore reads somewhat more accurately than the “standard” grade does. *** Not an ANSI symbol, but is commonly used as a designated name; also sometimes referred to as a Type “W”. ****Trademark of Hoskins Mfg NOTE: Individual T/C units may be calibrated by measuring their output at several known temperatures and preparing an error correction chart. This chart is used to eliminate any deviation from the “standard” output millivoltage versus temperature readings inherent in this particular thermocouple. The result is known as an “NIST” traceable thermocouple. |
||||||||


