HRW Installation Instructions: 4" (90mm and Larger Nozzles)
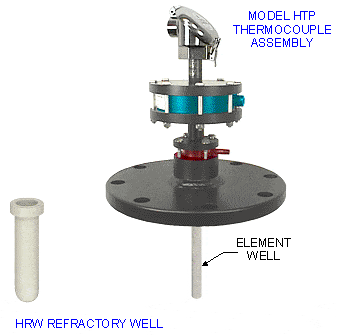
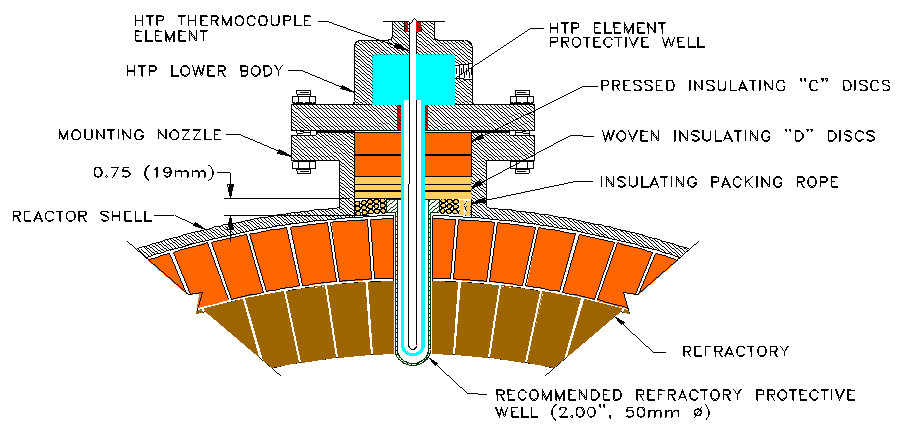
CUTAWAY SHOWING HRW WELL AND HNP INSULATION INSTALLED WITH HTP T/C IN PLACE
Procedure for Large Size Nozzle:
Perform Steps in Order Shown Below
- Put the HRW refractory well in place. The bottom of its collar must rest against the top face of the refractory and must be flush with the inside of the reactor shell. It MUST NOT be higher than this position. For example, excess mortar or refractory in the nozzle could raise the well higher and keep it from being in the correct position. If, the final position is too high, then the HTP element protective well will hit the inside bottom of the refractory well as the HTP is being installed. This will probably break one, or both, wells. Breakage of either will cause the HTP thermocouple to fail when the reactor begins operating. Chip out or otherwise remove any refractory or other obstructions in the nozzle before installing the refractory well. Take a tape measure or scale (no more than 0.5”(13mm) wide); measure from the inside bottom of the HRW to the top face of the mounting flange. This distance should be 0.5” to 1.0”(13 to 25mm) more than the HTP T/C insertion distance. “Insertion distance” is the distance from the face of the HTP mounting flange to the tip of the element protective well. If it is not within these parameters; do not proceed; determine what the problem is and correct it: THE HRW REFRACTORY WELL MUST BE IN THE CORRECT POSITION!
- Wind the rope around and against the inside of the nozzle wall; push each winding down into the cavity between the HRW collar and the nozzle wall. Continue until the cavity is filled and the packed rope is 0.25” to 0.50”(6 to 13mm) higher than the top of the collar. Cut off any excess rope and discard it.
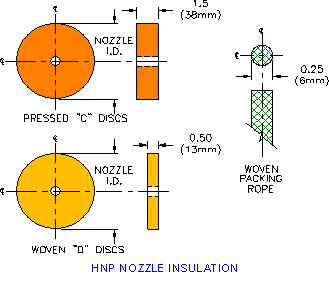
- Stack all of the woven “D” discs on top of the collar/rope. There should be 5 or more pieces of this type disc.
- Stack the pressed “C” discs on top of the woven “D” discs. The top of these discs should be 0.50” to 1.25” (13 to 32mm) above the face of the nozzle flange (the actual distance is equal to 0.15”(4mm) X the number of woven discs. A spare “D” disc is provided, install if needed; otherwise discard.
- Place a flat plate, such as a piece of flat board lumber on top of the discs. The plate must be wider than the I.D. of the nozzle. Press down evenly on the plate. A force of 25-50 pounds (11-22 Kg) should compress the insulation enough so that the flat surface is against the face of the nozzle flange.
- IF IT DOES NOT FIT:
- Verify that the installed insulation kit is for the nozzle that you are putting it in. The last number in the Model Number (on the outside of the plastic bag) indicates the intended nozzle height, in inches; e.g. M/N HPN-5.71-4.5” indicates that it is for a 6” S80 ANSI flanged nozzle which is 4.5” (115mm) high.
- If your nozzle is not the height indicated by the model number, secure the correct kit.
- If your nozzle size and height is the same as marked on the kit; then repeat steps (1) through (5).
- If it still does not fit, consult Delta Technical Document #TS HNP which covers the HNP kit.
- If no solution is found, and it still does not fit, contact Delta’s Shreveport Engineering Department for assistance.
- WHEN IT DOES FIT: You are ready to install the HTP Thermocouple assembly. Refer to the HTP instruction manual for guidance. It is still possible to break the ceramic well(s), which will cause the thermocouple to fail soon after startup of the reactor! PLEASE BE CAREFUL!
Please read the HTP instructions and follow them! You can and will get good results! Please do not “GUESS” as to how it is supposed to be done! The HTP can be broken and/or have its life shortened!
| ANSI SIZE | NOZZLE I.D. |
|---|---|
| 6″ S80 6″ S160 |
5.76″ (146mm) 5.19″ (132mm) |
| 4″ S80 4″ S160 |
3.83″ (97mm) 3.44″ (87mm) |
| METRIC | AS REQUIRED |